Should I create a banner... a background?... perhaps... perhaps A BUTTON. A simple button that is rather revolutionary. Why? Because, my friends, it is shiny.
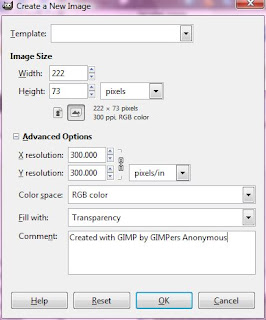
1) File -> New. Once you arrive at the dialog box, change the 'Background Fill' to 'Transparent' and set the size to 222 x 73, as shown:

2) Hit CTRL+A to select the entire box.
3) Then, click Select -> Rounded Rectangle. Its default setting is 50% (that is what I used for the button above). You can increase it or decrease it if you like, but I suggest that you leave it as is.

4) Now you want to add the gradient. I chose b5ffff as the lighter color (double click on a color to edit) and 0071c6 as the darker color. Select the gradient tool and choose the one that matches your color choice by clicking on the box after gradient (Click to enlarge):
5) With the gradient tool selected, click the top of the box (or near it) and drag down towards the bottom.
6)The next step is to create a bevel effect, which I did not know how to do, so I Googled it and found the following page: http://www.novell.com/coolsolutions/feature/17391.html. Then return here once you've created the bevel effect. I was able to follow the tutorial relatively well, which is the reason why I am posting the link.
7) Now, you want to make it look shiny. :D Select the rectangle tool, which is the first tool in the main box and looks like this:

8) Click Select ->Rounded Rectangle.
9) Select the paint bucket tool and change your main color to white. You can do so quickly by clicking the small black and white rectangle (1) then click the arrows (2). (Shown to the right)
10) Click on the window with your button. Hit CTRL+ALT+N and hit 'Enter'.
11) Now click (with the paint bucket tool selected) inside the selected area. Then change the transparency to 67%. Adjust the transparency to what you prefer.
Now you can add text or use it however you'd life. :) Enjoy your Web 2.0 button.

